Ragnarok Loki pt 2:
Helmet pt1
The first step to creating a helmet is to develop a pattern. This was my first ever helmet and I had no idea what I was doing. lol So I actually utilized Kamui Cosplay's patterns (link to her store can be found below at end of entry) in starting the base of the helmet. I had to change and alter the pattern a bit to get the forms I needed, as well as add pieces such as the cheeks and parts that go on top of the helmet. Patterns are a great base for any costume or piece, and it does not matter whether you make your own or purchase/borrow! Below image shows some pieces that had been size altered before being remade to what I needed and then cut onto foam.

So that I didn't freak myself out too much by wasting worbla, I made a mockup of the helmet before using the expensive material. I recommend doing this nearly always when expensive supplies are at risk! But this is what it looked like before any changes had been made to the new pattern and design. This was also way too small for my head and then the second mockup was too big. So after four mock-ups I finally had the right fit and design. #TrialAndError


After tons of mockups and finally being comfortable enough to just cry instead of ball over cutting the expensive material....I finally made the base of the helmet. This required lots of time and patience as I had to heat the pieces, put them together carefully as they formed the oddball shape of a head, reheat them to shape to MY head, continue to reheat on every side to make sure that things were even and properly fit......it was a nightmare at first. But the end result was great. :D Sadly, the helmet was slightly big for my head so I had to put in some foam inserts so that it fit snug. :) #NoProblemo!
Tiny strips of worbla pieces were added over the cracks and seams and then sanded down to smooth them out. Rinse and repeat for a few hours until cry.
I wanted my helmet to have a ponytail that was similar to the concept art for the first Thor film and some of the comic versions of Loki.
I made a little well-thingy and then detailed it with some celtic knot work that was painstakingly made from strips of worbla and tears. This would become the case for the wefts.
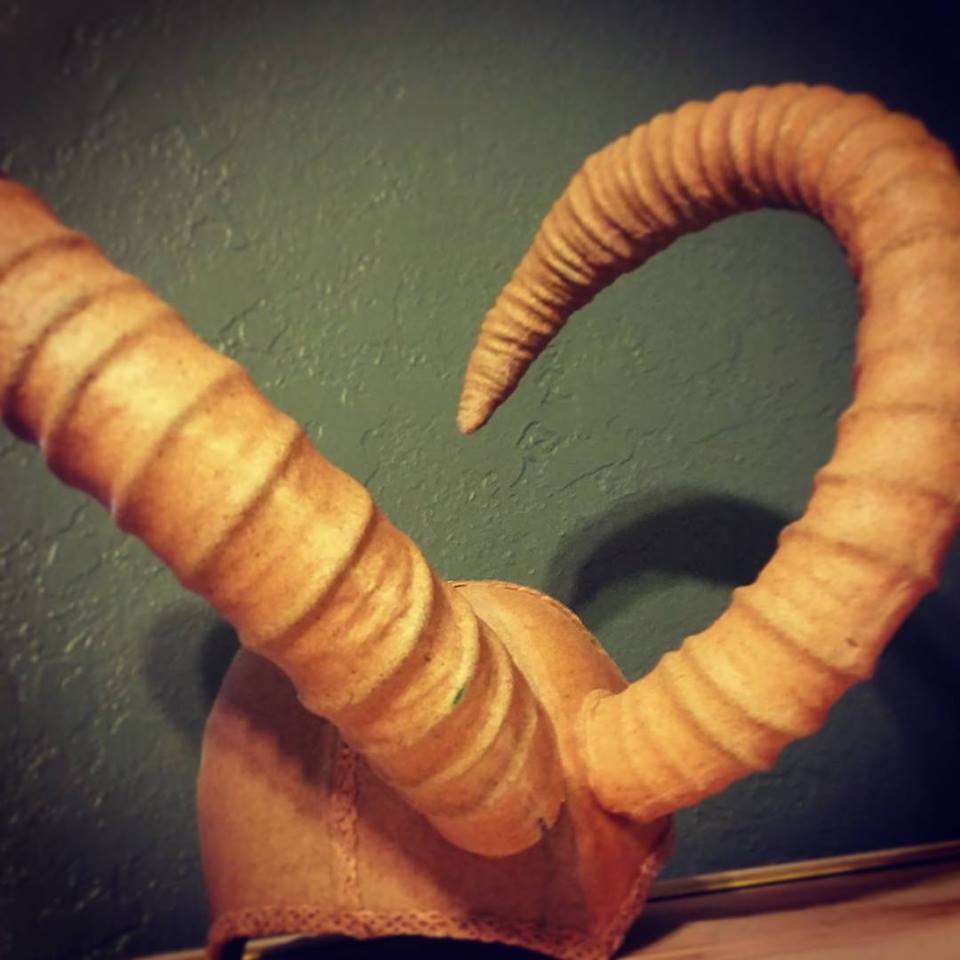
The horns were the next step. So many different avenues and the original sketch for my Ragnarok Loki included a helmet that was loosely based on the MCU version. But....after creating a costume so far that had so many different textures and organic elements to it, I ultimately decided I didn't want to do something that looked a lot like the MCU helmet (as much as I loved the concept). Nah. I decided instead to take some inspiration from nature! What could I find that was organic, textured, unique, and would be fun to paint and detail? Blesbok horns! Ridged, curved....beautiful. :3
And lo and behold....
Look at this beautiful masterpiece of a Loki design!! Earth X Ultimates Loki had some pretty badass horns. What's even cooler is that this is canon, and I could

Now, the key was finding a nice balance between the look of the Blesbok horns and the Earth X Loki and the MCU helmet I originally planned for this project. I decided to take the texture and overall appearance of the Blesbok horns and use it with the curved shape of the MCU horns. Or something similar anyway.
First the horns were cut from foam, and tips were added with aluminum foil and painters tape. Next I added layers of super thin wire to give the base texture.
The third step was adding more detail and thicker wire. This type of wire is used to hold up tomato plants or something of the like. XD But to me they were the perfect thickness. The key was that the wrapping didn't have to be perfect. The less perfect, the better.
*additional note: I added extra wire and thickness/weight to the tips of the horns as a counter balance since I knew right away that the helmet was going to be heavy and the weight would need to be supported towards the back of the head.
Worbla-ing was the next step. There were a lot of parts that I had to fill in, reheat and cut off/shape to get a cleaner and more realistic look.
I took into account that animals with horns tend to use their horns to fight with. this meant that horns get pretty banged up in certain areas. I will show you some more details when I get to the painted parts. :D
Now...placement....and...attach! ....and cry a lot....
Eventually you get something like this.....
After horns were applied....I spent hours and hours crying while making itty bitty details to cover the helmet. This helmet was going to be the story of the costume. The major piece. The book cover. The end-all-be-all....the...well...you get the point! This helmet at some point in the design process went from being just a helmet into becoming a very important story piece.
I created little norse runes, hundreds of celtic knots, a tree of Yggdrasil, flames, Mjolnirs, ravens, wolves....snakes.....tears of my pain....XD I can't tell you how long I slaved over the tiny pieces to get them made. Hahaha It was probably my least favourite part. But it was most definitely worth every moment of it.

I even added the recognizable Loki symbol you see him sport in the comics! The jewels were cast from resin and painted using acrylics and various nail polish colours.
"Everything Burns...."
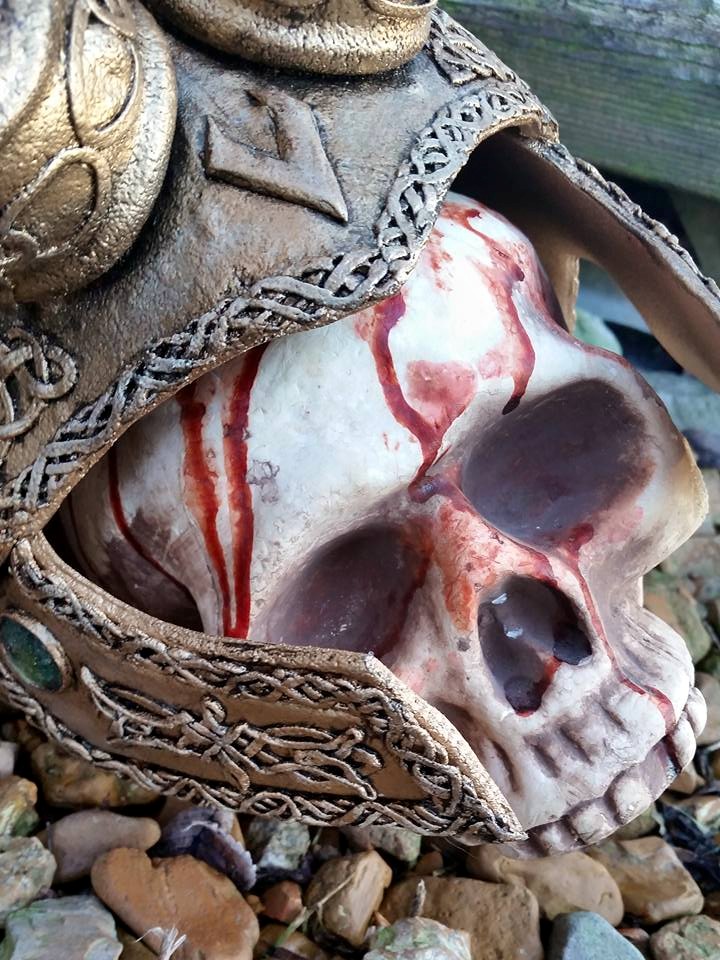
SIDE ONE (THE HELM):The Serpent Devours Midgard
The dreaded moment has arrived as Jormungandr, represented by the gold and blue jewel, wraps itself around the realm of Midgard, encompassing it and bringing about Asgard's doom.
SIDE TWO (RIGHT):Loki vs Thor and Odin
Here is the big battle. Where it all starts. We see Mjolnir letting off bits of thunder and lightning over the sacred troll cross of protection. Above the mighty hammer Fenris (left) and Hogun (right)(representing Loki and Odin) fight for the fate of Asgard beneath the rainbow bridge.
SIDE THREE (THE BACK):Loki Rules Asgard
The battle has been fought and won by none other than Loki himself, represented by the knotwork at the bottom center of the helmet base. He is surrounded by the remains of Asgard, protected by various norse runes representing cunning, lies, and Gungnir.
SIDE FOUR (THE LEFT):Everything Burns
The great tree of Yggdrasil burns. Everything has fallen, except Loki, who will rule the remains of the realms alone and detested. On the final panel of the helmet's story of Ragnarok, you see the tree of Yggdrasil in intricate knot work done in worbla, surrounded by flames and other inspired knot work.
The helmet metal was painted in 24kt gold, while the horns were painted to look like bone.
The horns were sprayed with a base coat of ivory spray paint and then I used acrylics in various shades of brown, black and grey to obtain a gritty and dirty bone detail. I used the awesome knowledge of my S.O. to figure out how to shade and highlight properly so that the final look was realistic. I used all of the scratches and knicks that I left in the worbla prior to painting to my advantage. Bones are not perfect, especially bones that are old and worn. This helmet was quite a journey for me....and will always hold a very very special place in my heart.
Links: